There is nothing like stepping into a cold shower to remind you just how important your water heater is to the overall comfort of your home. These vital plumbing fixtures are often overlooked until something goes wrong, at which time they become the central focus of your every waking moment.
Not everyone has the time to understand what keeps their water heater working safely and reliably, but a basic understanding of the parts and pieces that may need attention can be a valuable tool. One such component is the water heater pressure relief valve that controls the build-up of steam. This simple mechanism is found on both gas and electric tanks, and as it ages, it can develop leaks and drips leading to the need for replacement. Though you should always get professional assistance, it is wise to review the steps involved in the process no matter the level of your plumbing skills.
Safety First Through Proper Preparation
The best way to begin any project is to ensure safety. Water heaters can involve gas, open flame, pressurized steam, and of course, heat. In spite of the obvious risks, there are four simple steps that can make all the difference in creating a safe work environment.
Disconnect power
Flip the electrical breaker or turn off the gas to ensure your water heater is disconnected from the power. If it is an electric water heater the breaker will most likely be a 30 amp breaker. If it’s gas, there will be a shut off on the hose leading from the wall. If not, you will need to shut it off at the meter on the side of your house.
Turn off the cold water
Close the inlet valve coming into the water heater.
Drain the water
Turn on a faucet closest to the tank and run the hot water to bring the water level below the pressure valve.
Release the pressure
Lift the pressure valve lever to fully depressurize the tank.
Once you have securely prepared the area, you are ready to move forward with the removal and replacement of the water heater pressure relief valve.
Removal of the Old Valve
In order for a new valve to be installed, the old one needs to be removed. To disconnect the valve, you must first address the overflow pipe using these steps as a guide:
Disconnect the overflow pipe from valve
Depending on your hot water heater, some pipes are easily uncoupled and some need to be cut with a hacksaw.
Remove old valve
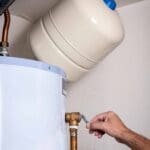
Using a wrench, carefully unscrew the old valve in a counter-clockwise manner.
It is good to note that when the faulty pressure valve is loosened, you may experience excess drainage. If this occurs, re-tighten the valve and repeat the draining process until the water level is low enough to no longer pour from the valve. As with all plumbing projects, water is present and there will always be a certain degree of leakage, so having plenty of towels and rags around to absorb excess drainage is a great idea.
Shopping Smart
Now that the old pressure valve has been removed, you will need to purchase a new valve for installation. When buying the replacement part, be sure you buy a valve built with the exact fit for your piping and the proper BTU rating. It is wise to bring the original valve and pipe in with you, which allows you to compare it with the hardware that is sold in the store. While you are there, double check your supply list to make sure you have plenty of thread-seal tape, applicable joint compounds, and necessary couplings. Your list may vary depending on the type of water heater you have, but the one factor that never changes is that having everything you need on hand saves time and money!
Out With the Old and in With the New
With the new pressure valve and all necessary tools and supplies on-site, it is time to begin the final stages of the project. To complete the process, you will want to proceed in the following manner:
Seal the valve threads – Using thread-seal tape or joint compounds, thoroughly cover the threads of the replacement pressure valve.
Secure the pressure valve – Screw the new valve into place by hand and then tighten further using a wrench, being sure not to overtighten.
Connect the drain pipe – Reconnect the drain pipe to the valve using plumbers tape or a joint compound according to the pipe material used.
Testing the New Valve
Now for the magic moment of testing the replacement valve and getting your hot water back to life. In reverse, you will go through the steps you followed to set up your workspace in the very beginning. Start with turning the cold water input valve back on, taking the time to check for leaks. Once you have completed that step, it is time to bring the power back to the tank so that the water can be brought up to temperature. To do this, simply re-flip the electricity breaker or turn the gas back on to relight the pilot light.
When researching the steps on “how to replace pressure relief valve on a hot water heater,” the complexity level may differ from one individual to another. Regardless, the friendly experts at Day & Night Air Conditioning, Heating and Plumbing are always ready to be of assistance, making sure your plumbing gets back to normal in a timely, safe, and successful manner. Contact us today for professional service and trusted advice in the Phoenix Metro Area!

